Accurate performance marketing data for your Shopify store is critical. It’s the difference between making data-driven decisions that boost revenue and flinging spaghetti at the wall and hoping it sticks.
The problem a lot of Shopify store owners face is getting that data accuracy in a way that offers meaningful insights. Using and auditing Google Analytics effectively is a great first step—but going beyond simple analytics with a multi-touch attribution model is even better.
In this guide, we’ll cover setting up Google Analytics 4 with your Shopify store and how to identify and fix issues. Then we’ll explore enhancing your data with multi-touch attribution in Google Analytics and in The Attribution Platform.
Key takeaways:
- Standard analytics dashboards are a good starting point, but they typically miss the full picture around cost data and transparency.
- To save time setting up enhanced eCommerce tracking data, use a third-party GA4 x Shopify service.
- Use The Attribution Platform to make smarter marketing decisions based on data you can’t get from GA4 alone.
How to Setup Google Analytics 4 on Shopify
Before anything else, you need to make sure you’ve got the basics: a Google Analytics account and a GA4 property.
- If you use Google products like Gmail or Google Ads for your store, you’ll also have access to Google Analytics with the same account. If you don’t have a Google account, create one first.
- Then, create a Google Analytics account. Once your GA account is ready, create a GA4 property. You’ll need at least an Editor role, which you’ll have if you created the account.
- Click Create > select Property. Name the property to match your Shopify store name. Follow the on-screen instructions to define your business size and category > finish on Create.
- Create a data stream for your new property by clicking Add stream > entering your Store’s URL > clicking Create stream.
- Note the Tag ID (“G-” or “AW-” for Google Ads) to keep handy.
These are the basic steps you need to set up the background items for data collection using either of the following three methods.
Method 1: Using Shopify’s Native Google Analytics Integration
This method is simple. Just follow these steps:
- Sign into your Shopify account. Search for the Google & YouTube app by Google LLC. Shopify will direct you to its app store.
- Click Install and continue.

Image Source: Google Help
- Review and allow permissions for the app > click Install again after reviewing.
- Connect your Google Account (if you haven’t already), or choose the Google account that owns the GA property for your store.
- Click Get Started in the “Looking to set up Google Analytics 4?”

Image source: Google Help
- Select your GA property > click Connect.
And that’s it—you’ve got access to web analytics for your Shopify store. It’s worth noting that this method has a few key limitations, including often missing ecommerce events and a lack of server-side tracking. Both of these can lead to incomplete insights and data discrepancies.
Method 2: Installing Google Analytics via Google Tag Manager
Using Google Tag Manager is a bit more complex, but it offers more flexible tracking implementation. Google Tags trigger tracking codes based on rules for when each tag must fire.
This method is better for tracking specific campaigns, but it can lead to duplicate data if you’re not careful.
To start, you’ll need a Google Tag Manager account. First, complete the basic account setup instructions, then create a Container:
- In the Container Setup section:
- Enter a Container name, which will be your Shopify store URL.
- Choose the Container type, which will be Web.
- Click Create and agree to the Terms of Service.
With your container set up, you can create your tags:
- Go to Google Tag Manager and select the container you’ve made.
- Click New in the Tags menu.
- Create a name for your new tag.
- In the Tag Configuration box, select Google Tag.
- Add your Google Tag ID in the Tag ID field.
- Click Save.
From there, you can set up additional configuration settings like user properties and shared event settings, or send data to a server instead of Google Analytics (to help site performance). To finish this setup, you’ll need to create a trigger:
- Click Triggering and use “Initialization – All pages” to use the Tag on all pages.
- Otherwise, specify the page by:
- Under “This trigger fires on”, select “Some Events“.
- Under “Fire this trigger when an Event occurs and all of these conditions are true“, add a filter to fire the trigger only on necessary pages, like “Click URL contains /path/LP/promo.”
With this Tag ID, you copy the code snippet from GTM and paste them into your Shopify theme files by following these steps:
Tip: Before making any changes to the base code, back up your theme.
- Log into your Shopify admin panel.
- Go to “Online Store” > “Themes” and click “Actions” > “Edit code” on your active theme.
- Add the GTM Snippets:
- <head> snippet:
Find the <head> tag in “theme.liquid” and paste the first GTM snippet immediately after the opening <head> tag.
- <body> snippet:
Find the <body> tag in “theme.liquid” and paste the second GTM snippet immediately after the opening <body> tag.
- Optional: Checkout Pages:
You can also add the GTM container code to the “checkout.liquid” file for checkout pages for Shopify Plus merchants.
- Save the changes.
This setup allows a more granular approach to using Analytics data. But as you can see, it can get complicated and be prone to human error.
Method 3: Using a Third-Party Shopify App
The third method we’ll cover here is using a third-party app. You might wonder, “Why would I use a third-party app when GA4 is free, and there’s a native integration within Shopify?”
The answer: easier setup of eCommerce-specific event tracking. Third-party apps can essentially do Method 2 above for you, in a more simplified manner (less room for error).
What apps can you use?
If we look at the Shopify app store, a few apps stand out:
Wixpa Google Analytics 4 (GA4). This is an apparently completely free app specifically designed for Shopify. It offers a no-code install, tracks all eCommerce conversion events, as well as Google Ads tracking. Reviews for the app rate it well (4.9/5), specifically highlighting the dev team’s excellent customer support.
The downside to using this app is likely due to it being completely free, which usually indicates the devs sell your data to other third parties.
Analyzely – Google Analytics 4. Unlike Wixpa, Analyzely has a limited free plan, with a paid plan at $19/month or $95.88/year. The free version allows Shopify integration with GA4 and offers a standard report that curates important insights.
The paid plan offers users an advanced eCommerce report, real-time reports, client and server-side event tracking, GDPR compliant tracking, and priority support. With the GDPR compliance feature, this app would be the best option for stores in the EU and UK.
The downside of using this app is the added expense when GA4 is free.
IN: Google Analytics 4 Copilot. If you want to install GA4 yourself but still want a third party to audit it, this app looks like the best choice. It’s free for instant auditing and setting up tracking reports, or pay a one-time fee of $49 to have the team configure GA4 for you.
The IN app seems to balance manual and automated setup, depending on your needs. But some 1-star reviews suggest issues with matching transaction data and server-side errors.
Each app offers simplified installation like the Google & YouTube app we detailed earlier.
Enabling Enhanced E-Commerce Tracking in GA4
Google Analytics 4 doesn’t track specific eCommerce events out of the box. You need to set that up yourself (or outsource).
For Shopify stores, getting this enhanced data is crucial for measuring specific changes to your store (like Conversion Rate Optimization [CRO] efforts) and marketing promotions.
Here’s how to setup eCommerce tracking:
- In Google Tag Manager, click Tags > New.
- Click Tag Configuration > Google Analytics: GA4 Event.
- In Configuration Tag, select your Google Analytics 4 Configuration tag.
- In Event Name, enter the event name.
- In Event Parameters, add a row for each event-level parameter outside the “items” array, like the “item_list_id” and “item_list_name” parameters in a “view_item_list” event.
- In Parameter Name, enter a name for the parameter.
- In Value, click “+” next to the field and choose an existing variable or add a new one.
- Save and publish the container.
Here are some eCommerce events to track:
- Make purchases or refunds.
- Add or remove a product from a shopping cart.
- Select an item from a list.
- View item details.
- Start the checkout process.
- Apply promotions.
You can add up to 27 custom parameters in the Event’s “items” array. Here’s an example of what the code would look like, using the “add to cart” event:
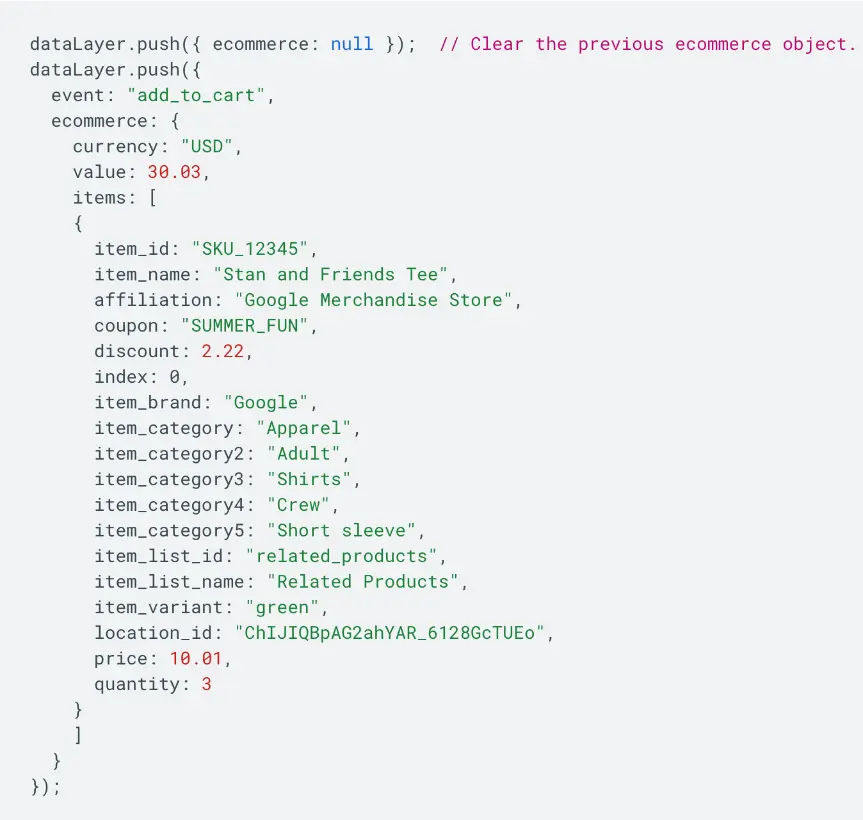
You can find more examples of code snippets of different event types in this Google Analytics help article.
Setting up Purchase Events, Product Views, and Cart Actions
If you installed the GA4 native integration with Shopify, you’ll automatically get some default purchase events, such as:
- Purchase
- page_view,
- Search
- view_item
- add_to_cart
- begin_checkout
- add_payment_info
These are some of the most important, but a few key pieces are missing that the integration does not track and send, including:
- Remove_from_cart
- View_cart
- Refund
Add these events manually using the steps above, alongside detailed parameters for accurate purchase tracking. Essential parameters you should include are:
- Currency
- Value
- Transaction_id
- Coupon
- Shipping
- Tax
- Items (array)
This is a basic summary. For more details, see “set up ecommerce events” in the Google Developer documentation.
Testing Events Are Firing Correctly
Google Analytics tends to take up to 30 minutes to collect data. To validate your installation quickly, use DebugView in the Google Analytics Debugger Chrome Extension, or Google Tag Manager’s Preview mode on the debugging page.
Using Google Analytics Debugger Chrome Extension:
- Install the Extension: Download and install the Google Analytics Debugger Chrome extension.
- Enable Debug Mode: Enable the extension > refresh the page.
- Check Events: The extension will log events in debug mode, allowing you to view them in the DebugView in the Firebase console.
Using Google Tag Manager Preview Mode:
- Enable Preview Mode: In Google Tag Manager, click on “Preview” in the top right corner.
- Open a New Tab: A new tab will launch with the Tag Manager Debug mode.
- Navigate to your store in another tab.
- Check firing tags: The Debug mode will display which tags are firing, including your e-commerce event tags.
You can also check Real-time Reports in GA4 to see if any data is coming in and verify the data collection.
If your events are logging in the debug/preview modes (or in the real-time report), that means they’re firing correctly. If not, here are some quick troubleshooting tips:
- Check event names and parameters match the GA4 property, even tiny typos cause issues.
- Verify tracking code implementation in Shopify theme pages.
- Test different browsers and devices to see if the issues are device/browser-specific.
- Check for duplicate events.
If all else fails, you can also contact the Google support team for help. These implementation and testing steps highlight the value of using a third-party solution for eCommerce data tracking.
Troubleshooting Common GA4 and Shopify Integration Problems
To offer some realistic expectations, it’s unlikely you’ll ever have perfect alignment between the two platforms. Some data gets lost or misattributed when moving between them. But you can mitigate those losses with regular monitoring and troubleshooting.
You might run into a few other integration issues besides the above improper configuration (see the above section for troubleshooting those).
These often include missing purchase data, duplicate transactions, and simple issues like timezone and currency differences.
For the latter, the simplest solution is to wait at least 24 hours before considering data as unaccounted for, and also consider how GA4 will use the previous days’ currency exchange rate. This one factor can create inconsistencies in gross revenue reporting.
Fixing Missing Purchase Data
There are a couple of different issues that can cause missing purchase events in GA4, which include:
Users abandoning the “thank you” page before GA4 records the purchase event.
To figure out if this is the problem, compare the number of completed orders in Shopify with the number of “purchase” events recorded in GA4. If GA4 is showing significantly less orders, then there are likely client-side issues affecting the tracking (like page load time/timeouts).
Client-side tracking scripts are blocked by ad-blockers or privacy settings.
To check ad blocker usage on your store in GA4, go to “Reports” > “Engagement” > “Events” > Filter for sessions with ad blockers.
Third-party payment processors’ redirects disrupt the tracking flow.
Shopify often redirects users through third-party payment gateways like PayPal, Stripe, and BNPL options. When this happens, GA4 typically loses the user, assuming they ended their session and treating their return as a new session.
The best solution to these issues is using server-side tracking with a Google Tag Manager container instead of client-side tracking. With server-side tracking, you get your data directly from Shopify servers instead of relying on on-page user activity.
Resolving Duplicate Transactions
Duplicate transactions in GA4 often happen when the “purchase” event is triggered more than once for the same order. This can skew revenue data and affect attribution accuracy.
Common causes include tracking installed via both a Shopify app and custom code, or visitors refreshing the thank-you page after purchase.
To prevent duplicates, implement deduplication parameters. Include a unique “transaction_id” with each “purchase” event. In Shopify, the “order_id” can be passed as the “transaction_id”.
If you’re using a theme or third-party app that injects additional tracking scripts, check that they aren’t firing a second “purchase” event. Review the checkout and thank-you page templates, and check the app’s documentation or support to disable redundant tracking.
For historical reporting, use GA4 Explorations or BigQuery to filter out duplicate “transaction_id” values. Create a report that counts distinct “transaction_id”s or flags orders with multiple hits, giving you a clearer picture of actual purchase behavior.
Customizing GA4 Attribution Models for Shopify
One of the key insights you should gather from your store’s data is lead attribution. This information tells you what marketing, UX, and CRO efforts are driving the most value.
Google Analytics 4 can track and monitor attribution, with “Data-Driven Attribution” as the default option.
You can check (and change) the attribution model by opening up GA4 > Admin > Data Display > Attribution Settings:

This model uses machine learning algorithms to attribute credit for key events based on event data. It incorporates factors like time from the key event, device type, number of ad interactions, ad exposure order, and creative assets.
Data-driven attribution requires a lot of data to be useful, so it’s not ideal for early-stage Shopify stores. This model may also be more complex than what eCommerce stores need, since eCommerce typically has a fairly short sales cycle.
There is only one other attribution model available in GA4 as of April 2025: last-touch attribution (both paid and organic).
This model weighs most (if not all) of the credit to the last interaction someone had with your store that led to a key event or conversion. Last-touch can be useful if your store is in its early stages, as it doesn’t need historical data.
Google Analytics used to provide first-touch attribution, position-based attribution, and time-decay attribution—but deprecated these models in November 2023.
Setting up Proper Campaign Tracking with UTM Parameters
To bypass GA4 and Shopify’s basic attribution models, use campaign tracking with UTM parameters. These Urchin Tracking Modules (UTMs) add parameters to URLs to help GA4 distinguish traffic sources, which means you can use them across different marketing channels.
Here are basic step-by-step instructions for creating UTMs in Google Analytics:
- Open Google’s Campaign URL Builder.
- Fill in the link attributes in the builder form, which includes these required fields: website URL, campaign source, campaign medium, either campaign ID or campaign name.
- Use the generated UTM link in marketing materials you want to specifically track, such as Facebook posts, blog posts, CPC Google ads, etc.
- GA4 will automatically track incoming campaigns through the UTM codes. You can access the data by clicking on Acquisition > Overall or Traffic Acquisition.
You can also track this data in the Shopify Analytics dashboard by going to Shopify Admin > Analytics > Reports. Check Sessions by Referrer or Sessions by UTM Campaign.
There are some best practices to keep in mind for UTM naming conventions, especially for Shopify stores, which include:
1. Keep UTM parameters standardized and consistent. Always use lower-case letters, e.g., GA4 treats “facebook” and “Facebook” as different sources. Avoid spaces, using dashes (-) or underscores (_), e.g., “utm_medium=cpc”.
Here’s a good example of UTM parameters:
utm_source=facebook&utm_medium=cpc&utm_campaign=springsale
2. Define a UTM naming framework to help keep your campaigns consistent over time, here’s an example framework:
[Platform] – [Ad Type] – [Campaign Name] – [Target Audience]
Which can look like:
utm_source=facebook&utm_medium=cpc&utm_campaign=summersale&utm_content=retargeting
3. Use clear and descriptive campaign names to avoid confusion and duplicate UTMs. Here are some good examples:
Campaign Name: Black Friday Sale, UTM = utm_campaign=blackfriday_2024.
Campaign Name: Spring Collection Launch, UTM = utm_campaign=spring_collection.
Campaign Name: Holiday Gift Guide, UTM = utm_campaign=holiday_gift_guide.
4. Avoid using UTMs on internal links. This creates self-referrals and breaks session tracking in GA4. For internal links, use the base analytics tracking or Google Tag Manager for specific campaigns.
Using the UTM approach gives you flexibility to analyze your traffic data and assess attribution based on that data.
Beyond GA4: Enhancing Shopify Analytics with Multi-Touch Attribution
It’s unlikely for customers to find your store for the first time by typing in the URL, and making a purchase on their first visit from the home page.
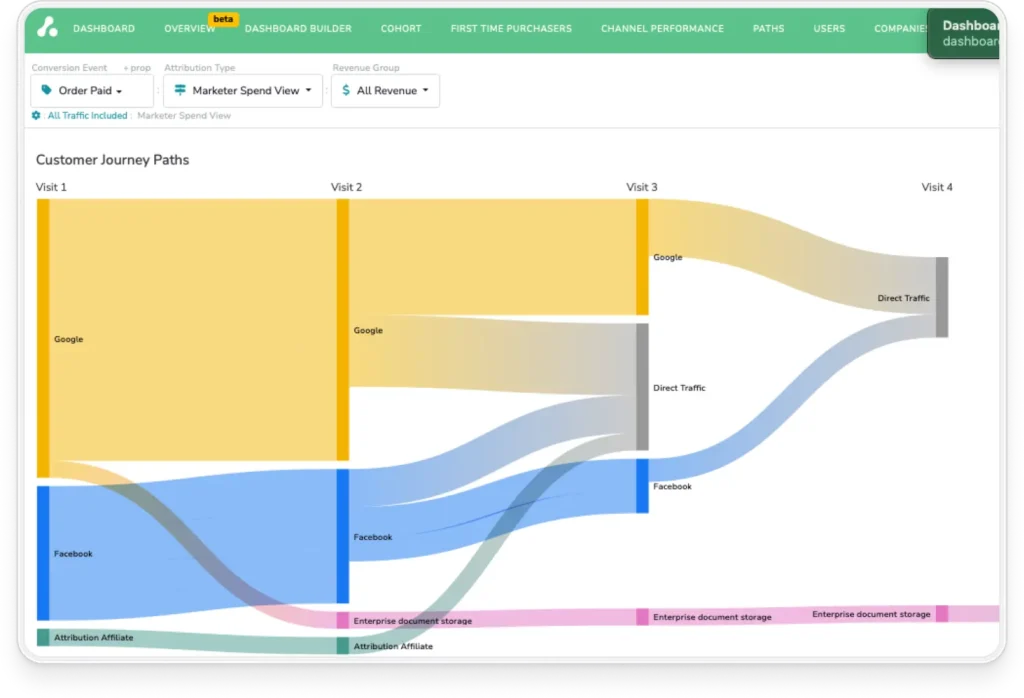
It’s more common for customers to take a journey through multiple touchpoints. To measure that journey, you need a multi-touch attribution model.
While GA4’s default “Data-Driven Attribution” model is technically multi-touch, it has a couple of downsides:
- The machine learning algorithm needs historical data to work.
- It has limited transparency and works like a black box. The platform doesn’t disclose weighting and doesn’t have a fixed formula, for example.
Shopify analytics tools like Attribution offer deeper insights than GA4 and Shopify dashboards because they unify data from multiple sources beyond GA4, including offline campaigns.
How The Attribution Platform Enhances Shopify and GA4 Data
The Attribution Platform’s Shopify integration connects directly with Shopify to track purchase events with better accuracy, even when GA4 falls short—like when users bounce between devices or get redirected to payment processors.
Server-side integration avoids issues like missing or duplicate transactions and shows a clear customer journey from ad click to conversion.
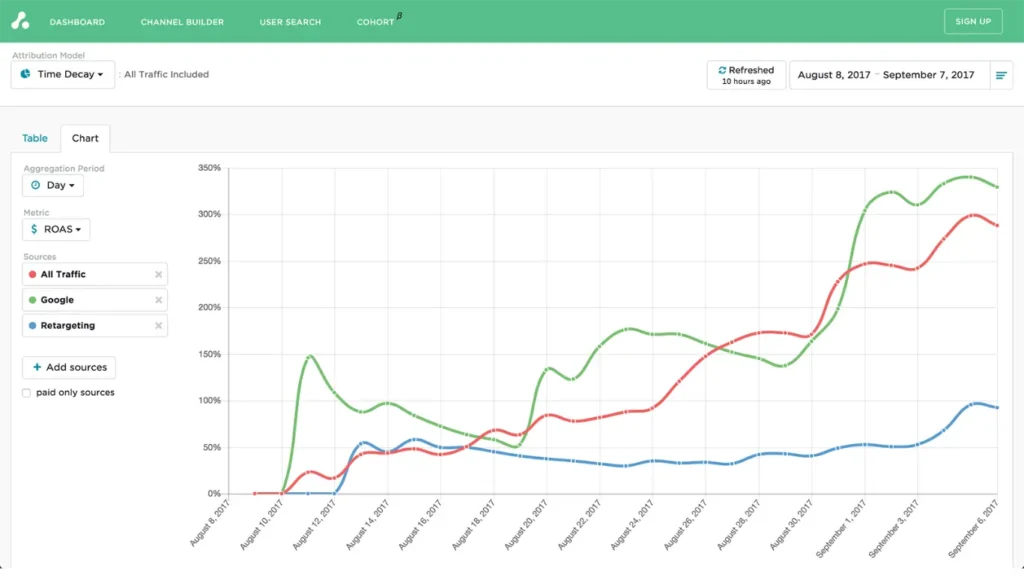
The Attribution Platform can unify cost data from ad platforms like Meta, Google, TikTok, and more with your Shopify revenue. This gives you a full view of return on ad spend (ROAS) across channels—without manually stitching together reports.
You can also use multiple attribution models that suit your business better. Compare performance using first-click, last-click, position-based, linear, time-decay, or algorithmic models—all in one dashboard.
With The Attribution Platform, you can see insights like:
- True CAC per channel and campaign
- Details like CPA, ROAS, and LTV.
- Full-funnel impact of top-of-funnel ads
These insights help Shopify brands make smarter marketing decisions that GA4 alone can’t support.
Setting up a Complete Attribution Solution
Using Attribution’s Shopify integration is simple. Just go to the Conversion Integrations page in your account settings and click “Connect“:
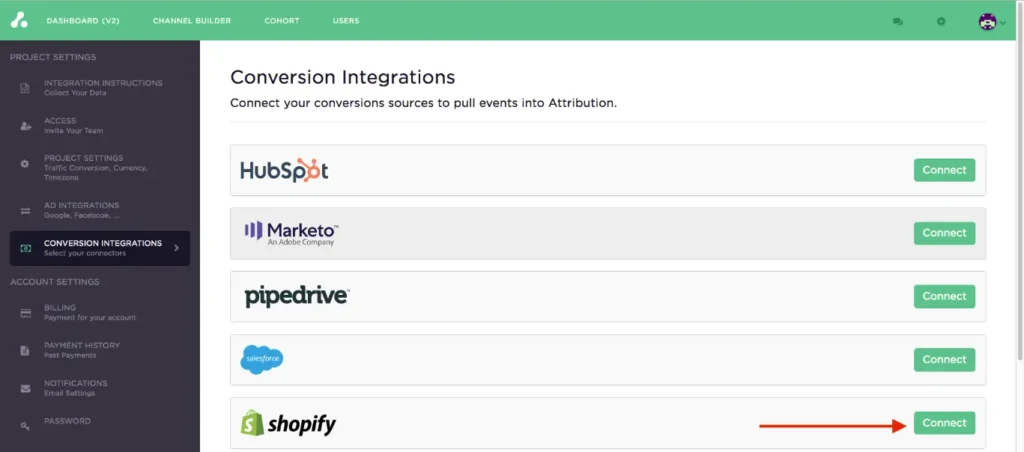
Follow the on-screen instructions to connect to your Shopify store and allow permissions. You can use the same approach to connect other marketing software, as shown in the image above.
For other marketing channels like Facebook or Google Ads, The Attribution Platform will use automatic tagging on campaigns after you’ve connected the integrations. For other platforms like Reddit, you’ll need to use UTM parameters.
Using additional integrations like Segment, you can automatically track conversion events and relate them to customer interactions for more precise behavior analysis.
Overall, using The Attribution Platform as a unified dashboard brings all your marketing performance data into one place, eliminating the need to switch platforms.
You can easily compare campaign results, track ROAS across channels, and spot what’s driving revenue. It saves time, reduces reporting errors, and helps you act on insights faster.
To move beyond GA4-only attribution, connect Shopify and your ad platforms to a tool like The Attribution Platform. Setup is typically quick, with prebuilt integrations for easy syncing. Use GA4 for user behavior insights and lean on Attribution for a clearer view of full-funnel performance.
Sign up and try The Attribution Platform today — pinpoint CAC by channel, audit funnels and conversion rates, scale revenue-driven content marketing, measure affiliate LTV and CAC (and more).
Shopify Google Analytics FAQs
How do I track Shopify checkout steps in Google Analytics?
With the correct event parameters in place, like begin_checkout, add_shipping_info, add_payment_info, and purchase, you can view the “Checkout Journey” within the “Explore” tab.
Can I use both Universal Analytics and GA4 with my Shopify store?
No. Google discontinued Universal Analytics in 2023—you should now have transitioned to GA4 in your Google account.
What are the best Google Analytics 4 reports for Shopify store owners?
- Traffic and Acquisition Reports. GA4 Path: Reports > Acquisition > Traffic Acquisition.
- Ecommerce and Purchase Behavior Reports. GA4 Path: Reports > Monetization > Ecommerce Purchases
- Checkout Behavior Reports. GA4 Path: Explore > Create a Funnel Report.
- Conversion Reports. GA4 Path: Reports > Engagement > Conversions.
- Customer Lifetime Analysis. GA4 Path: Explore > Cohort Analysis.
- Site Speed and UX. GA4 Path: Site Performance Report > Custom exploration.
Why is The Attribution Platform better than Google Analytics for measuring Shopify marketing performance?
Attribution offers multi-touch attribution modeling, which gives you a transparent, full-funnel view of your marketing efforts and Shopify purchase data, while giving you the ability to unify cost data to analyze ROI and ROAS.